Recap
In the previous article, we have witnessed about adding Redis to the Docker container and learnt about connecting Redis container with asp.net core web-api.
If you haven’t read my previous article yet, I highly recommend you to read it by clicking here.
DockerFile
Before going into details of creating a DockerFile, let’s deep dive into the concept of DockerFile.
Docker can build images by reading an instruction from a DockerFile. DockerFile is a text document that contains all the commands a user could call on the command line to assemble an image. Docker build execute the instruction from the DockerFile to create an automated build using command lines.
Create a new DockerFile by selecting “Add Docker Support” in VS
Usage
Update the DockerFile with the below instruction
FROM mcr.microsoft.com/dotnet/core/aspnet:3.0-buster-slim AS base
WORKDIR /app
EXPOSE 80
EXPOSE 443

FROM mcr.microsoft.com/dotnet/core/sdk:3.0-buster AS build
WORKDIR /src
COPY *.csproj .
RUN dotnet restore
COPY . .
RUN dotnet build  -c Release -o /app/build

FROM build AS publish
RUN dotnet publish  -c Release -o /app/publish

FROM base AS final
WORKDIR /app
COPY --from=publish /app/publish .
ENTRYPOINT ["dotnet", "RadisCacheDocker.dll"]
Let’s understand the command of the DockerFile in a stepped manner
FROM mcr.microsoft.com/dotnet/core/aspnet:3.0-buster-slim AS base
FROM: Sets the base image to use for subsequent instructions. FROM must be first instruction in the DockerFile.
In the above line, we have been instructing Docker to download & install the aspnet core runtime image from the hub repository into the container. Here, we are using run time image rather than sdk image due to certain number of reason
- Run time images are smaller in size and can easily travel across network from hub repository to your docker host.
- Application can be quickly deployed due to smaller binaries.
WORKDIR /app
WORKDIR: It is used to define the work directory of the docker container. Commands such as ADD, COPY, RUN, CMD and ENTRYPOINT can be executed in the specified working directory.
If the WORKDIR command is not written in DockerFile then in that scenario, docker compiler will automatically creates it for you. It can be concluded that WORKDIR is similar to MKDIR and cd.
In the above line, we are instructing Docker to create a working directory as app, if the directory doesn’t exist.
EXPOSE 80
EXPOSE 443
EXPOSE: It is used to inform Docker about the container listening on specified network port.
We are expose port 80(http) and port 443(https) for our container.
FROM mcr.microsoft.com/dotnet/core/sdk:3.0-buster AS build
You might be wondering why we need SDK, when we already have run-time image. Correct? The answer is that we are using multi-stage build.
Now the question arises, what is multi-stage build? The idea being, to “build” your project you need a different set of things. But to “run” your built code, you need a different set of things.
For instance, .net core application can be built using microsoft/aspnetcore-build base image whereas, microsoft/aspnetcore can be used to run the application.
COPY *.csproj .
Here we are copying our project to the current directory.
RUN dotnet restore
By using RUN dotnet restore command, we are instructing NuGet to restore all the dependencies that are specified in the project.
COPY . .
RUN dotnet build  -c Release -o /app/build
The “COPY . .” copies the entire project recursively into the container for build. The main reason behind separation of two copy command with dotnet restore and then the complete copy command with dotnet build is a Docker caching trick to speed up the builds. It is done this way to avoid installation of project dependency upon every code change.
FROM build AS publish
RUN dotnet publish  -c Release -o /app/publish
Here, we are publishing the .net core application in the release mode.
COPY --from=publish /app/publish .
The above command is used to copy the contents of output directory from the publish stage into root directory of our run time stage.
ENTRYPOINT ["dotnet", "RadisCacheDocker.dll"]
ENTRYPOINT: It allows you to configure a container that runs as an executable. You can consider ENTRYPOINT to be similar to CMD as it allows you to specify command with parameters.
Build the image
Docker build command builds the Docker image from the DockerFile. Here’s the command for Docker build
docker build -t rediscachedemo:v1 .
Note: You need to execute this command from the directory in which the DockerFile exists.
This will generate an image that will be stored on your local machine. You may see a list of all the images installed by running:
docker image ls
Running the image
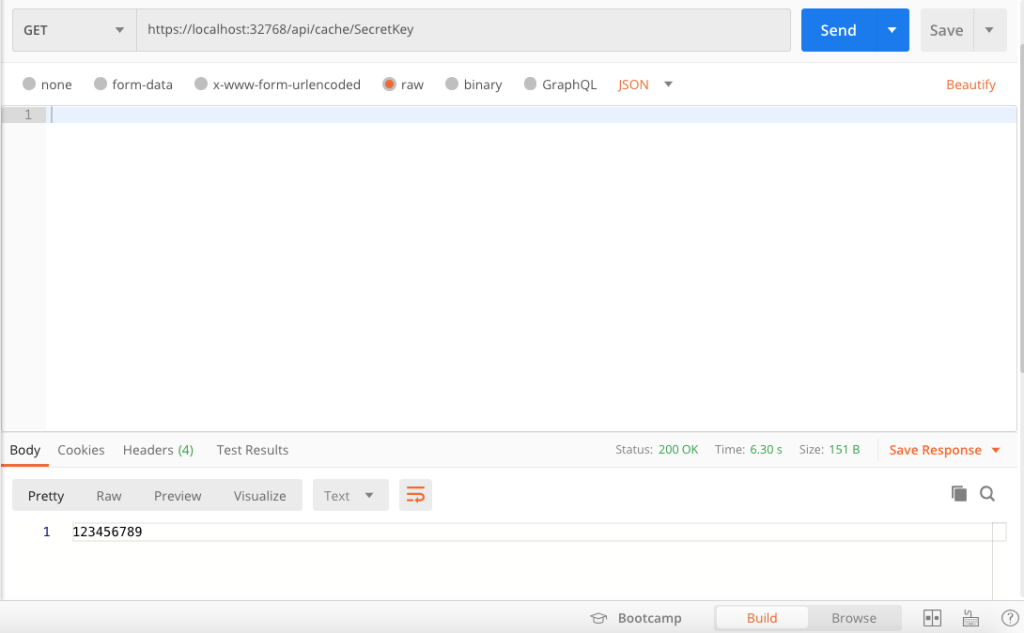
docker run -p 32768:80 rediscachedemo:v1
Here, the application running on rediscachedemo:v1 image and publishing the container’s port to host on port number 32768.
Running the application
After running an application, you will get an error stating “unable to connect on localhost:6379”. The error seems to be reasonable because on one hand Redis is running in different container whereas, our application is in different container. With this logic in place, our application cannot connect with Redis using localhost

In order to make our application work, you need to specify the Gateway ip address of Redis in the connection multiplexer. You can get the Gateway details by running:
docker ps
//Get the container id from above command
docker inspect <container id of redis>
You can find the details about Gateway in the NetworkSettings section.

Now lets modify our code in Startup.cs
 public void ConfigureServices(IServiceCollection services)
        {
            services.AddControllers();
            IConnectionMultiplexer redis = ConnectionMultiplexer.Connect("172.17.0.1");
            services.AddScoped(x => redis.GetDatabase());
        }
After modification, code seems to be working perfectly!
I hope you like the article. In case you find the article interesting then kindly like and share it.
